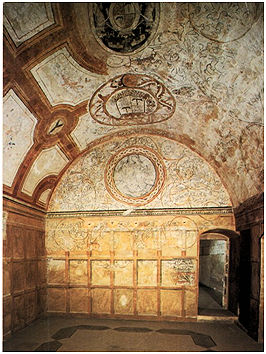
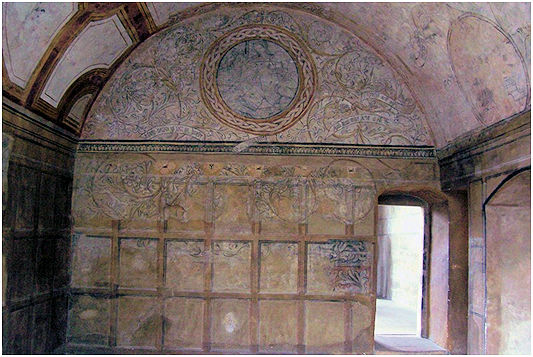
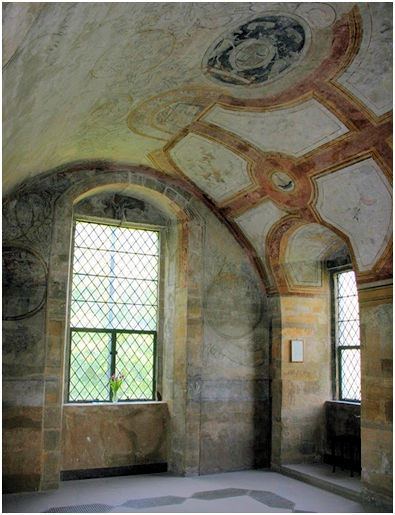
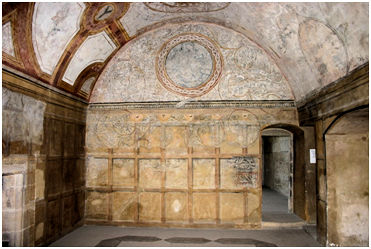
The North room occupies the north-east corner of the first or principal floor of the residential block of Kinneil House overlooking the main drive and formal gardens and so it must have formed part of the private quarters of the Earl of Arran and his wife. The arrangement of rooms suggests that it was originally the private bed chamber of the Earl in the late 1550s and that the earliest set of murals belong to that time. The decorative scheme was changed in 1620 by painting directly over the earlier ones. Even later these were hidden by wooden panelling on the walls and a coat of plaster on the ceiling. Today it is known as the ‘Arbour Room’ after the main decorative theme which represents a shady sitting place in a garden, surrounded by climbing foliage. The room is vaulted along its N/S axis and measures 20ft long by 15ft wide with the springer line for the barrel vault at 9ft from the floor and the crown at 15ft. Vaulting on first floors is not uncommon and imparted a sense of security and homeliness, replicating the wooden loft vaults found in less substantial houses such as Culross Palace. The entrance is in the south end of the west wall. The communicating doorway to the South Room abuts this entrance and there was a hint in the surviving paintings that both doors may have been contained within a portal door or internal porch (see the discovery). In 1620 the door to the South Room was blocked up and the area painted in the new scheme of decoration.
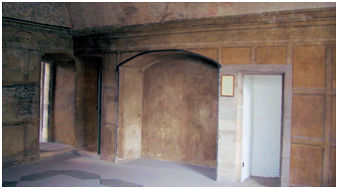
Another doorway in the west wall to the north of the alcove gives access to a mural garderobe. The wall recess has a segmental arched head in which probably stood a buffet. It has been suggested that the alcove was suitable for a bed but it is far too close to the doors for that propose. The back wall of the recess is very narrow and at least part of it is of brick. On the other side of the wall at this point we now have the spiral stair but originally this area may have been occupied by a private chapel. There is therefore a possibility that there may have been a vizzying hole (peep hole) in the wall here. A large window occupies the centre of the north wall and a slightly smaller one is placed nearby at the north end of the east wall with an original central simple-moulded fireplace to its south. As in the South Room, there are stone margins round the windows, doorways, and fireplace.
Although the two periods of murals are displayed together, to avoid confusion they will be described separately.
THE 1550s MURALS
The work commissioned by James Hamilton, Duke of Chatelherault and 2nd Earl of Arran, is painted on the primary coating of plaster and on the stone margins. It consists of a dado reaching up to a height of around 4ft 6ins, on top of which is a dado band approximately 1ft 4ins wide, and then an area of scroll decoration in the form of a bower which extends over the ceiling. There is no frieze but the decorative scheme on the upper walls contains large figurative roundels.
(a) The Dado
The rich red background of the dado gave the room a warm and elegant feel. On this were large open foliate designs.
.
.
.
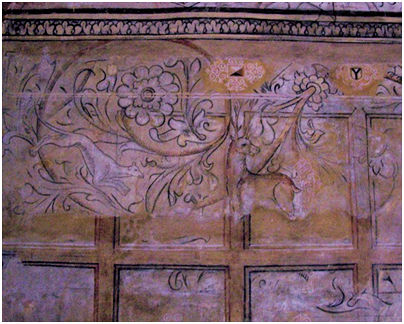
Illus 2: The South Wall showing the top of the red Dado below the grey and white Dado Band, partly immersed under the 1620 scheme of Fake Panelling.
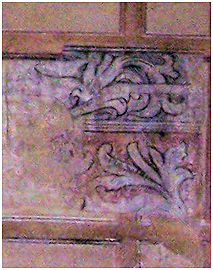
(b) The Dado Band

Illus 3: Dado Band on the south wall.
This band was underlined by four narrow black lines and topped by two such lines. It contains a similar large foliated style design to the dado but here it is arranged as a continuous scroll set on a grey background. The mantling is of sea-weed character, resembling the leaves of Irish moss, which folds over and under a median rod. On the south wall it can be seen extending across the bare stone surround of the window.
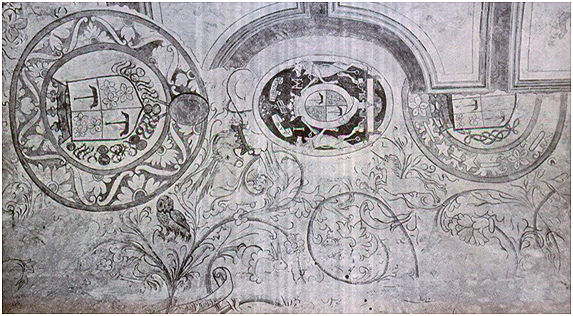
(c) The Bower or Arbour
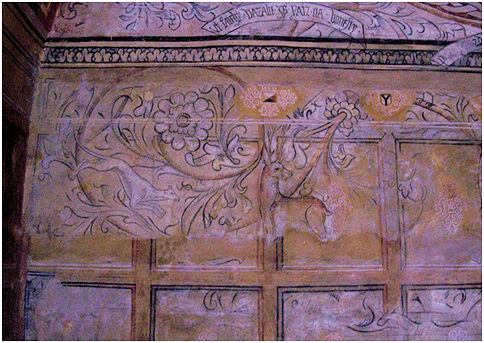
Growing up the wall faces from the dado band and extending over the vault is a bower of curling and coiling stem-work, embellished and embroidered with a great variety of leaves and blossoms. Within its free spaces were set, as if by chance, birds, animals, and heraldic beasts. On the south wall twin stems rise from the centre of the dado-band. A greyhound can be seen coursing a deer and further along there is another small mammal. A fluttering dove poised before a human face protrudes from a bell-flower. Higher up the wall, above the coving, are a squirrel, a rabbit, a pheasant feeding, and a bird perched on a stem.
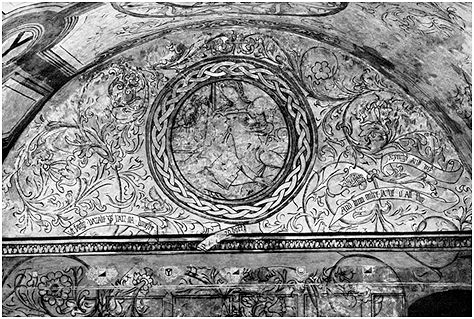
The two stems on the south wall sweep outwards and upwards enclosing the picture roundel in a number of circular sprays clothed in leafy lambrequin and having blossom-like “collars” with terminals suggestive of marigold, rose, lily, and bell-flower.
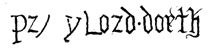
Floating amid this pictured pleasance are inscribed ribbons and labels, curled at the ends, which bear descriptive stanzas. The late Gothic script on the south wall reads as follows:

Little of this period of decoration has been uncovered on the west or east walls. The importance of the fireplace on the latter is emphasised by a particularly thick trunk rising from it and by lettered banners to either side. The west side of the ceiling of this period has been recovered and here the beasts become even more exotic and include a galloping unicorn and an antelope as well as an owl, and a rabbit emerging from a flower bell facing a dog. The decoration on the side walls has been arranged in a manner similar to that on the south wall, but with the difference that there is a pair of twin stems instead of one on each wall which convolve over the walls and ceiling and circumscribe the picture and the heraldic roundels until they reach each other at places in the medial line of the vault. The artist, when emphasizing the main stem-work, has in some places only drawn one outline of the stem in black; this he has ” hatched” with short in-lines and then formed the thickness of the stem with ochre. Closely arranged and short in-lines are formed in the foliage where relieving is necessary, and they also appear drawn across the medial lines of foliaceous work.
The inscriptions on the scrolls here are badly damaged, but from what remains readable they appear to have been proverbial sayings and spiritual exhortations The banners here read:


One long legend is mostly illegible and the only part that can be made out is “TREBIL AND”.
At either end of the ceiling there is a band with a red background and ochre borders contained in narrow black lines. The band has a continuous scroll containing pansy-like flower heads.
The narrow spaces of the north wall on either side of the recessed window are of similar treatment, and, as there is a decorated band margining the ingo, the space left is mostly taken up by the circular picture panels and the underlying scroll. The arbour decoration in each wall space is therefore not extensive and rises from a single stem. The north window ingoes are decorated with big free-flowing stem and leaf work extending upwards in continuous S curves and on the lintel was a display of the Douglas mullets.
This screen of foliage swept its curvilinear outlines around pictorial and heraldic roundels, the latter occupying the crown of the ceiling.
(1) & (2) The Heraldic Roundels
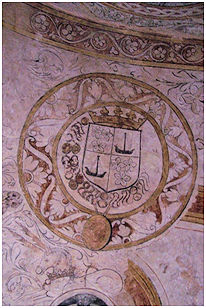
The two heraldic roundels set on the ceiling have their bottom sides to the north as if they were meant to be viewed from that end of the room.
The roundel furthest away (ie on the south) depicts the arms of James, 2nd Earl of Arran. The quartered coat ensigned with a ducal coronet for Chatelherault and with the collar of the cockle, with the jewel of St Michael attached, is surrounded by a circular frame ornamented with alternating S curves and half flower heads. The Michael hangs over this bordering. Below the roundel is a single supporter, the Hamilton antelope —shown couched, collared, and chained.
The north roundel shows the arms of Margaret Douglas, Countess of Arran ensigned with a coronet as above and with a cordeliere of four knots—the cinquefoil (for Arran) and the mullet (for Douglas) appear on the decorated band of the circular frame. The underlying single wodehouse supporter is obliterated.
(Picture courtesy of Adrian Mahoney @ The PR Store)
(3-7) The Picture Roundels
The figurative roundels were disposed in the following manner—the largest high up on the south wall, one on either side of the window at the north end, and two on each side on the vault set just above the springer line.
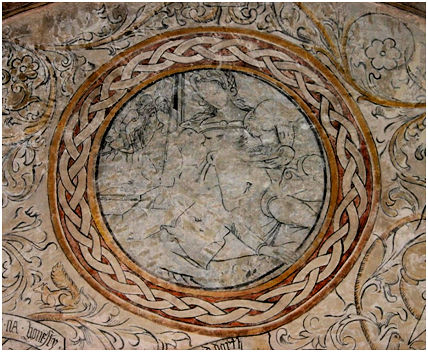
(3) Samson and Delilah.
The composition represents Delilah as a young woman, seated and holding the scissors in her hands with which she has just the shorn the hair of Samson. Samson is asleep at her feet, with his body resting against her knees; his legs are drawn up in an uncomfortable manner, the head lies over to the right, and in front of it is extended his right arm and hand. Delilah wears a reticulated coif, which has a frontal border, and her falling tresses outline her bare neck. She is dressed in a low-necked corsage which has boffants at the elbows and shoulders. Samson is shown in a jerkin and trunks. On the left a flight of steps leads to an entrance, and without stand two Philistine warriors armed with shields and spears and in the attitude of conversation. The picture is shaded in grey tones, and the enclosing frame is ornamented with interlaced ribbons coloured red, the marginal rings being in ochre. (South Wall.)
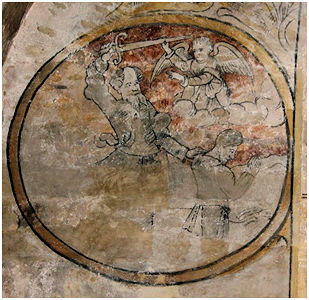
(4) The Sacrifice of Isaac.
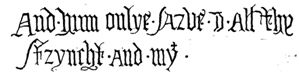
In the representation of this scene, Abraham is shown holding the kneeling figure of his son by the left shoulder and brandishing a sword. Out of the clouds appears an angel, who grasps the sword blade and, with the left hand extended, admonishes Abraham. Below the roundel is the label inscribed with the appropriate verse set in four lines, the words “to mak,” “Soune Isaak,” [ye] “Lordis Com[and],” “Thy hand” are legible
(North wall, west of window.)
(Picture courtesy of Adrian Mahoney @ The PR Store)

(5) David and Bathsheba.
King David robed, crowned, and playing a harp is seen standing on the roof of his house. He is looking down at Bathsheba who is bathing. The messenger, who David sent, dressed in a slashed doublet, is approaching the naked woman. In the background a ridge is crested by a coppice. The inscription in the underlying label has been obliterated. In this and the previous subject the sky is tinted red representing blood.
Bathsheba was married to Uriah the Hittite who was away fighting in the war for David. According to the story, Bathsheba slept with David that night and became pregnant. Consequently David ordered Uriah to be put into the thick of battle and he was consequently killed. David then married Bathsheba. (North wall, east of window.)
(Picture courtesy of Adrian Mahoney @ The PR Store)
(4) The Temptation of St Anthony
The picture is badly damaged. In the left lower quadrant it shows the aged saint, bearded and naked, reclining with his hands joined and uplifted in prayer. Behind the saint stands the devil, and to the right are two chests. The foremost of these stands open and is apparently full of coins. Behind these boxes appear to be traces of the legs of a nude female.
Michael Pearce has shown the similarity of this image to that of a contemporary woodcut by Jost de Negker where the devil is shown between two women.
(West wall, south half.)
(Picture courtesy of Adrian Mahoney @ The PR Store)
THE 1620s MURALS
Early in the seventeenth century the lower decorated surfaces were painted over to represent oak wainscot. This imitation, three panels in height, with a frieze-board and cornice, rises to the level of the springer-line of the wagon vault. The decorations on the upper parts of the end walls and on the ceiling were also painted over to resemble enriched plaster work. The paint seems to have been applied on a prepared surface washed over the earlier painting. A greater range of colours was used including blue, green, umber, light red, and flesh tints. Black was not used for outlining the designs. From the design of the central heraldic panel this decorative scheme can be assigned to a date between 1621, when the 2nd Marquess was made a Knight of the Garter, and 1624, the year of his death in London at Whitehall.
The painter Valentine Jenkin had been employed by Ann Cunningham to redecorate Hamilton Palace and he was then engaged to embellish this room at Kinneil House. From Kinneil he went on to the palace at Stirling Castle which was being revamped in preparation for the state visit of Charles I. The work was finished around 1630, but it was 1633 before Charles left London. Jenkin may have been back to Kinneil in 1634 to finish up, for in August 1634 the accounts record: “To Valentine the painter upon his task £20:6/-” and “Given to Valentine Jenkein for painting the galleys £100.”
The imitation panelling consists of three panels of wainscot with a broad decorated band or frieze along their tops surmounted by a cornice. The narrow cornice represents a cyma-recta moulding enriched with an acanthus ornament. There are two black lines under the ornamentation and two thicker ones above; the topmost being much broader than the others in order to provide a perception of depth. The frieze takes the form of a plain band punctuated over each upright style of the panelling with a small block or armorial; the heraldic emblems being set alternately. The blocks are drawn and shaded to give the impression of a faceted projection, and the small shields portray either the Arran galley or the Cunningham shake-fork.
These decorative notes are further enhanced by frames of small-scale strap-work in a pale colour imitating of marquetry. Jacobean patterns of this strap-work order occupy the central area of each panel.

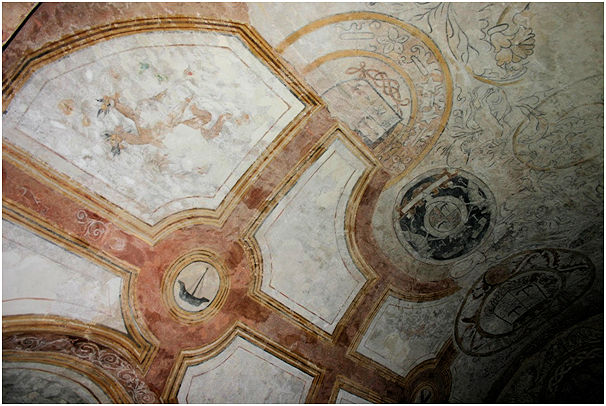
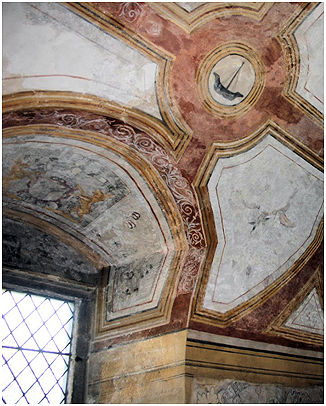
The ceiling decoration of imitative ribs with painted enrichments in the panels is a type of plaster ceiling favoured in Scotland at that time. The central feature in the pattern of ribs is a large oval, supported at the cardinal points. The rib extending from each side of the oval branches into two arms, which find their base on a demi-rib resting on the wainscot. A horizontal rib set between the oval and the cornice is linked by a roundel to each of the outlying transverse ribs. These circular panels, originally four in number, contained alternately the galley and the shake-fork.
A wall-rib terminates the ceiling at each end, and the wall-spaces enclosed by the arch were decorated in a similar manner. The main band of each rib was painted red and enriched with a scroll of leaf-and-stem ornament in white. Marginal lines of different colours suggest the rib mouldings. Each of the large spaces within the rib-pattern is ornamented with a spirited and delightful representation of an amorino [a small chubby naked boy representing a cupid] in the Italianate style adopted by Flemish painters. The babe is entwined in light floating drapery and flying in space, scattering fruit, blossom, and floral sprays through the air.
The end-wall surfaces above the painted panelling were treated like the ceiling with panel patterns and amorini. It was found in removing the late seventeenth century plaster that the designs, owing to the nature of the pigments, had been fortuitously transferred to the inner face of the plaster, and sections removed from the walls, showing the decorations in reverse, can now be seen in the exhibition room on the upper floor of Kinneil House.
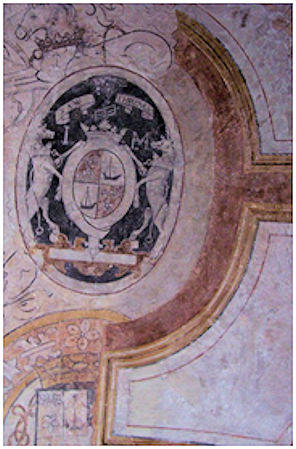
Within the central oval of the ceiling are the achievement and supporters of James, 2nd Marquess of Hamilton, set on a dark grey background. The oval quartered shield (Hamilton and Arran) is enclosed within the Order of the Garter; the supporting antelopes stand on a strapwork frame of an underlying label. Over the coronet is the crest – an oak tree fructed and penetrated transversely in the main stem by a frame-saw. The motto “SAW THROUGH” in Roman lettering appears on escrolls on either side of the crest. On the dexter side of the coronet is the letter I for James, and on the sinister the letter M. and H. conjoined, for Marquess of Hamilton.
On the soffit of the east window is a large grey panel, on which is set the achievement of the 2nd Marchioness, Anne Cunningham, daughter of James, Earl of Glencairn. The shield charged with a “shake-fork” is set on a cartouche of strap-work design. The supporters are rabbits (cunnings). The shield is ensigned with a coronet, from which rises the crest, a unicorn’s head couped, on either side of which are scrolls bearing the motto “FORK OVER,” and the initials M. / A. H. The side enrichments outside the panel represent daffodils and fruit-bearing sprays of apple, pear and cherry trees. In the space at the window lintel are two sprightly cupid figures, poised amidst falling blossoms, and holding from suspended cords a plaque on which is displayed the Marchioness’s cypher set under a coronet. A corresponding design adorned the similar space above the north window.
(Picture courtesy of Adrian Mahoney @ The PR Store)
On the north side panel of the buffet recess appears a small sketch of a small nude female figure seated and spinning thread by hand with distaff and spindle. This spinster is drawn in a red line and coloured with flesh tints. It is not known if this was part of a larger scene but its diminutive size fits well with its location.
LATE 17th CENTURY DECORATION
Later on, near the close of the century, another alteration was effected. Memel wainscot was introduced – the so-called Queen Anne panelling mentioned in the newspaper reports in 1936 when it was removed for re-use elsewhere. The painted work on the ceiling and upper parts of the end walls was obliterated by a thick coat of plaster. To provide fixing points for the woodwork, horizontal channels were cut at intervals in the wall-faces destroying parts of the mural decorations.
CONTEXT
In the Lord High Treasurer’s accounts for the year 1553 the following entry appears: “Item, to the masonis on Kynnele, in drinksylver, at the laying of the ground stanes of the palice of Kynnele.” This is generally taken as the reward money given to the masons at the start of the building of the wing which contains the painted rooms. By the following year the palace would be completed, and the painter at work on the mural decorations. That same year, 1554, Chatelherault resigned as regent in favour of the Queen-Mother, and the contents of the national purse were no longer his to command.
There have been suggestions that because of their cartoon character the murals at Kinneil were never completed. However, that character had evolved from earlier wall paintings seen in Scotland at such places as Dryburgh Abbey. It was the style chosen and it is possible that they fulfilled the desired effect. Even with the loss of some colour due to their exposure to light these paintings still have a pleasing appearance. Nor is it an indication that the murals were intended to be temporary, perhaps merely preliminary sketches for tapestries. They are competently executed and stand in their own right. Whilst it might have been simple to replace the scenes of the Good Samaritan in the Parable Room, this would not have been the case with the ceiling of the Arbour Room. Stretching the fabric of a tapestry over the vaulted ceiling would have created problems. Rather, it seems that that vault was created intentionally to receive the painting.
Walter Bynning was the painter most patronised by the governors of Scotland at around this time and after 1554 he worked for the Queen-Regent. It is therefore probable that he was the artist responsible for the murals at Kinneil. Whoever the creator was it would seem that he had been trained on the Continent and had worked with tapestries.
The tales of Abraham and Isaac and of David and Bathsheba are related to one another in many ways and hence the positioning of the roundels portraying them on either side of the window on the north wall. They both included the element of repentance – a theme common to most of the scenes depicted at Kinneil – and the death of a child. After the killing of Uriah and the birth of King David’s son the prophet Nathan confronted David. Nathan used a parable in which he told of a rich man taking a poor man’s only sheep and killing it, even though he had many flocks of his own. David, a former shepherd, was so angered by this story that he responded, “As surely as the Lord lives, the man who did this must die! He must pay for that lamb four times over, because he did such a thing and had no pity” (2 Samuel 12:5–6). Nathan then pointed to David saying “You are the man!” David repented and Nathan said, “The Lord has taken away your sin. You are not going to die. But because by doing this you have shown utter contempt for the Lord, the son born to you will die.” The child did die a week later and so did three of David’s other sons – the “four times over” judgment David had pronounced upon himself.
The relevance of these scenes to Chatelherault’s life may be related to his own wife and sons. In 1532 Arran had married Margaret Douglas, who was about ten years older than him. She was a daughter of James Douglas the third Earl of Morton and Catherine Stewart, herself a natural daughter of James IV. Clearly this was a political marriage arranged by Arran’s elder half-brother and guardian, James Hamilton of Finnart. Margaret Douglas was given the house and lands of Kinneil for her lifetime should her husband die before her. In all they had nine children – five boys and four girls. His eldest son, James, was declared insane in 1562 and must have been showing signs of this in the late 1550s. A second son, David, later became insane. The girls all married well.
James had been used as a political pawn for most of his life. Leaving aside the many attempts to arrange a suitable marriage for him there were also periods of various forms of captivity. In October 1544 James, only 12 years old, was taken to St Andrews Castle, where he was Cardinal Beaton’s guest and a pledge for the alliance between the Regent and the Cardinal. Two years later a Protestant band seized the castle, murdered the cardinal and held James as a prisoner. After being freed with the aid of French forces James went to France with the young Princess Mary in 1548. He was at Chatelherault when his father admitted to being a Protestant in June 1559 and became a fugitive from the French authorities. He was only able to escape the country with the aid of William Cecil’s agents working for Elizabeth I of England. Upon his return he took a prominent role in the Lords of the Congregation which resulted in Scotland becoming Protestant. The strain of all this activity caused a mental breakdown. At Easter 1562, his father confined him to his bedchamber at Kinneil House – probably this very room! James escaped using a rope made from his bedsheets and made his way across the Forth. He never married and died in 1609.
Is this reflected in the story of Abraham and Isaac – that of a father willing to sacrifice his son? Is the contrived marriage of David and Bathsheba a reflection of failed political alliances? It is interesting to note that the ointment jar featured in the depiction of Mary Magdalene in the South Room is unusually in the shape of a heart which was a personal device of James (usually with an arrow pointing down).
Above all there is reason to believe that the stories may relate to the governance of Scotland.
- At one time Mary of Guise had promised Chatelherault that he would inherit the crown if her daughter died childless, but secretly she arranged for the French monarch to succeed. The betrayal of Samson by Delilah.
- Chatelherault was tempted with bribes from all quarters – a dukedom in France, royal marriage in England, and offices of state in Scotland. The Temptation of St Anthony.
- Bribery was a poor motivation upon which to determine the fate of a nation. Samson and Delilah.
- The willingness to do God’s bidding without question, including the sacrifice of one’s own son, could be seen as a vital part of the medieval theory of good rule – of Old Testament kingship. Abraham and Isaac.
- Royal power could be abused. David and Bathsheba.
Above all the stories in the two painted rooms indicate that a useful life, justice and good governance were a matter of personal moral choice and it is clear that Chatelherault believed in an elective monarchy and that by their poor actions a monarch could be justifiably removed. He reflected this in his own behaviour, giving up the Regency in 1554. In the late 1550s his eldest son was considered to be the choice of the Lords of the Congregation to lead the country.
Just as the decoration within and without Kinneil House is unified so too was the written history of the Hamilton dynasty which seems to have been commissioned about this time from a figure known as Friar Mark. This makes Kinneil the focus of the family fortunes and will be dealt with in more detail elsewhere. However, here it is useful to note that Friar Mark gives the example of Saul whose destruction was caused by his choice not to obey God’s commands, indicating that it might be right and just to remove a king who disobeyed God’s word. Just what was God’s command on the verge of the Reformation was debatable!
The 1620s scheme is more architectural in character and reflects the style found elsewhere at this time. One of the best remaining examples of the fake ribbed vaulting can still be seen at Grandtully Chapel where it is executed on wood. Even at this period the display of coats-of-arms was important to the standing of the family.
BIBLIOGRAPHY
| Apted, M.R. | 1966 | The Painted Ceilings of Scotland, 1550-1650. |
| Richardson, J. | 1941 | ‘Sixteenth and Seventeenth Century mural decorations at the House of Kinneil, Bo’ness, West Lothian.’ Proc Soc Antiq Scot. 184-204. |
These descriptions are heavily based upon James Richardson’s account.
