The South Room occupies the south-east corner of the first or principal floor of the residential block of Kinneil House overlooking the main drive and formal gardens and so it must have formed part of the private quarters of the Earl of Arran and his wife. The arrangement of rooms suggests that it was originally the presence chamber of the Earl and that the murals belong to that time. It later became Duchess Anne’s bedchamber and the decorative scheme was changed, hiding the murals. Today it is known as the ‘Parable Room.’ It measures 20ft 6ins long by 17ft 6ins wide, and is 16ft high. There appear originally to have been two entrances, one towards the north end of the west wall from the outer hall, the other in the west end of the north wall leading to the North Room (now called the Arbour Room). The fireplace is in the middle of the east wall with a large window with a segmental arch to the north and a reconstructed garderobe doorway to the south. In the south wall is a similar large window set to the east of its centre. The wall surfaces are covered with a thin coating of mortar-plaster, except at the margins of the doorways, the fireplace and the splayed window ingoes and soffits, where the dressed stonework is exposed. It has been suggested that the window areas were originally covered by wooden panelling.
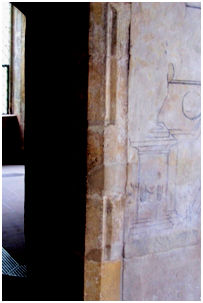
Illus 2: North Doorway showing re-used moulded stone margins.
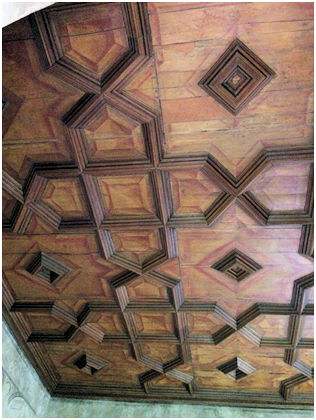
This room contains an expensive coffered oak ceiling, which is set in a pattern framework of mitred ribs composed of small and various mouldings, some of which have been painted in black to imitate ebony inlay. The whole is set on oaken boards, which show traces of outlining with bands of red paint, and there are small decorations in the same colour at the outer angles of the panels. In its character the ceiling shows a marked Italian influence, for which prototypes are to be found in the Palace of Fontainebleau in the galleries designed by the Italian architects at the Court of Francis I.
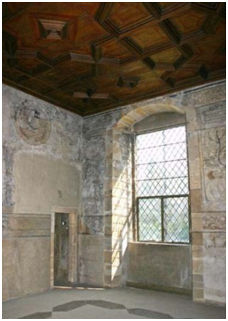
Illus 3: The South Room looking south-east. The reconstructed gardrobe doorway sits within a large area where the murals were removed for a later window.
The 16th century mural decorations used a black pigment for line drawing; white, applied in washes; grey tints used in shading and for a ground wash; and russet-red for the infilling and background. Ochre is employed sparingly for emphasising hair, the heraldic supporters and the foliaceous scrolls. The paint used would have employed protein size made from waste kid leather or parchment called “skrowis”, with chalk and pigments, including natural ochres, vermilion, and orpiment often mixed with indigo to form vibrant greens. The brushwork was applied on the plaster surface when the ground was still damp. The decoration in this room gives the impression of an assemblage of large tapestry cartoons, each one related to its particular wall surface yet forming part of a general and comprehensive scheme drawn on a background of antique parchment tone.
The north, west, and south walls are arranged in four horizontal zones – (a) the frieze, (b) the picture panel, (c) the dado band, (d) and the dado.
(a) The Frieze
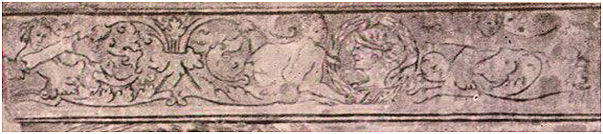
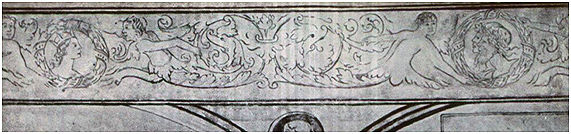
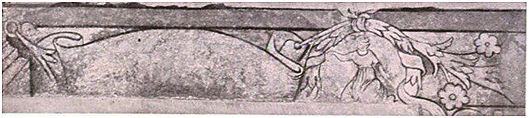
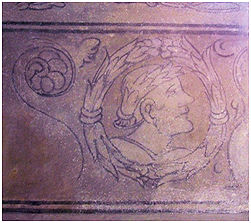
The frieze is confined within double-lined margins and the pattern is continuous except where interrupted by the window in the south wall. The composition consists of a series of portrait busts set within laurel wreaths and centred at wide intervals, the intervening spaces being filled by supporting youthful satyr-like figures with arabesque acanthus-leaf tails, curling upwards, circling round and terminating in dolphinesque heads. Where the tails meet they are collared by a foliaceous annulet, above which a leafy cluster protrudes from the tails. Three medallions are disposed on each wall. Of these the best preserved are on the south wall and include a head with a hair ribbon circlet tied at the back. On the west wall are a young queen with an antique crown; two laureated heads superimposed, the one that of a bearded man and the other that of a young woman; and a bearded king with an antique crown. All the faces are in profile. Human masks have formed the connecting links at the two western corners. There is no frieze on the east or principal wall, its place being taken by the heraldic displays and an angel musician.
(b) The Picture Panels
A series of arcades set on columns with moulded bases occupies the broad band below the frieze. They have capitals of Corinthian character but of a style greatly removed from that of the pure classic form. Each spandril, shown as ashlar masonry, contains a small round window in which is framed a human head. Each arcade has a four-centred arch and provides the architectural framework for a figurative scene. The picture panels illustrate six episodes from the Parable of the Good Samaritan as well as smaller individual panels of St Jerome, St Mary Magdalene, and Lucretia. The figures are near life-size. The cartoons on the south wall are the best preserved. The others have suffered the loss of much of their outlining and detail, which have been obliterated, or removed by stugging to attach later wooden panelling or by cutting away the plaster for a window and a door. In spite of this the picture panels remain impressive. Small inset panels containing inscriptions provide information on the scenes and are in so-called Middle Scots with late Gothic lettering. A large plain label, which formerly contained a descriptive stanza, hangs on the central column in the west wall, and another such label rests against the architectural foreground in the last scene of “The Good Samaritan.”
The individual panels within this band will be described in due course.
(c) The Dado-Band
The dado-band, like the frieze, is an arabesque setting. On the east wall above the fireplace are traces of an inscription label, a wreath containing a blind-folded figure in a flowing gown (presumably Justice), and a floral swag. On the south wall are medallion-portrait roundels supported by cupidesque figures with curling acanthus and fruity tails. On the west wall are compositions of vases, children, floating ribbons, floral sprays, and bunches of fruit; and on the remaining wall there is slight evidence of similar compositions.
(d) The Dado
The dado contains a series of arcades supported on square pillars which underlie and support the colonnade of the main panels. The piers are enriched with detail, and each arched panel contains a central urn out of which grows a luxuriant design of scrolled conventional leafage, while above is a cherub’s head. The base of the dado is slightly elevated from the floor.
The painted outlines of these patterns are not confined to the plaster surface but are carried over the naked stonework. A set pattern is to be seen on the soffit of the window in the east wall and at the window ingoes the decorations take the form of foliaceous sprays, scrolls, and human masks.
Descriptions of the Picture Panels.
The Coats-of-Arms.
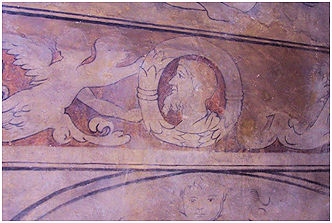
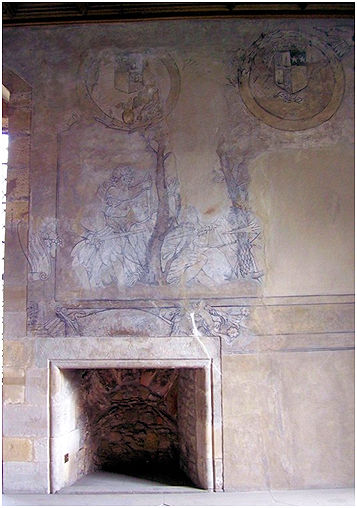
Two large wreaths are set towards the top of the wall over the fireplace. Each one bears in its upper half a shield ensigned with a ducal coronet and held by its appropriate supporters. The dexter shield is quartered with the Arms of Arran and is collared with the insignia of the Order of St Michael, and the sinister shield bears the arms of Arran impaled with those of Douglas of Morton and is ringed with a love-knot. These armorials represent the heraldic achievements of James Hamilton, 2nd Earl of Arran, as shown after the year 1548 when he became the Duke of Chatelherault, and his Lady—Margaret Douglas.
Ochre has been freely used in the heraldic roundels. A musician angel figure with outspread wings and flowing drapery, playing a lute, occupies the space between the sinister roundel and a column which margins the south end of the wall. The angel underlies the ceiling line, but a subject below—of which a hand pointing upwards remains—was destroyed when a window was later formed in the place occupied by the garderobe, the entrance to which has now been restored.
(On the east wall over the fireplace.)
The Parable of the Good Samaritan series.
(2) The Certain Man Falling amongst Thieves.
This panel occupies the prime position within the room, being located above the fireplace which for much of the year was the focal point. It is for this reason that the all-important coats-of-arms of the Hamilton family prominently surmount it. It is therefore apt that the story of the Good Samaritan should commence here and be traced around the walls of the room in a clockwise direction for a further five panels. It starts with the most dramatic scene – an eye-grabbing act of violence. This cartoon, which is on a white ground, shows more shading in washes and brush lines of grey than any other of the compositions.
The picture shows the traveller, who has been forced to the ground behind a tree, in the act of rising by pushing himself up using his left arm with one knee bent. His right arm is raised and the hand outstretched more in supplication than defence. He is outnumbered and has clearly been stripped of his outer garments – being dressed only in a long-sleeved undershirt and slashed trunks. He is surrounded by three armed men who are piercing his body with their swords whilst a fourth approaches with a spear. A bearded brigand, standing behind the fallen man, is forcing his sword with both hands into the breast of the victim.
This man is wearing a helmet on his head and is dressed in a sleeved shirt of mail over which is worn a short-sleeved jerkin, emphasized by a reticulated pattern. Another of the thieves holds the head of his prey and forces the point of a sword into the unfortunate’s back. This thief wears a breast-plate over a sleeved garment and a knee-deep skirt of free flowing and lobated character. The third attacker is stabbing the right side of the fallen man with his sword, and his left arm is raised upwards from the elbow. This man is shown in a pleated kilt and breast armour with short lobated sleeves. The figure approaching from the viewer’s right poises his spear in front of a tree, behind which is to be seen an oval shield held in his right hand. Each of the attackers has a different design of sword handle – one has a wheel pommel, the next a basket hilt and the third a plain terminal. The characters are well drawn and their stances and perspective make a vibrant scene.
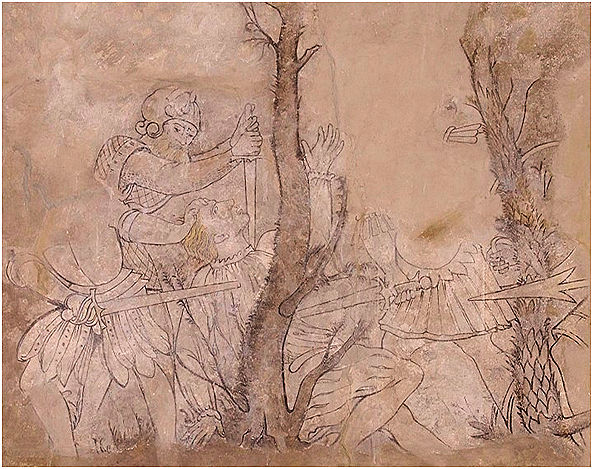
The two tree trunks are well drawn and shaded to make them appear in the foreground. They have short lower branches stretching out. The boles taper upwards and that on the right is covered with scale giving the exotic (ie foreign) appearance of a giant fern. The top parts of the trees are lost, but the roundels containing the coats-of-arms are surrounded by leaves suggesting that the whole upper part of the panel represented the leafy canopy of the forest and that the violent action below was taking part under its concealing cover. This scene, although immediately over the fireplace, is on the left side of the panel, and the missing section to the right, now missing, presumably showed the road from which the traveller had been dragged.
(On the east wall over fireplace.)
(3) The Levite and the Priest Pass By.
The distraught and badly wounded victim, with hair standing straight up, is seated on the ground at the left-hand bottom corner of the panel. His hands, resting on the ground, are joined in supplication and his legs are crossed below the knees. He is looking pleadingly upwards in the direction of the approaching Levite and Priest. The latter, absorbed in discussion, are wending their way on the road leading from Jerusalem to Jericho. The figures are labelled on their garments “The Priest” and “The Levite,” but their identities are in reality transposed. The Levite is studying an open book which he holds in his left hand cradled into the crook of his arm. He is bearded and wears a doctor of divinity’s square cap (16th century style) and is dressed in a doublet, over which is worn a fur-lined long gown fringed in front with fur. Frills adorn the wrist, and a scarf hangs loosely over the shoulders. The legs are stockinged, and the only shoe visible is of the broad-toed type of the period. The Priest is clothed in the imaginative vestments of the High Priest officiating in the Temple often shown in 16th century art. The face is clean shaven, the hair carefully arranged and covering the ears. On his head is a mitre ornamented in front with a crescent and two large oval crystals, while other pseudo-gems also adorn this head-piece. The vestments shown are a long flowing alb, over which is a dalmatic girded at the waist with a sash, from which hangs a tasselled scrip. A lappet covers the shoulders; both this and the dalmatic are enriched with apparel, and the latter is fringed with pendant lobes. The priest’s right hand rests on his girdle, and the left is raised as if emphasising some point in their discussion. Slightly behind him and to his left is a dog. Verdure is displayed in the foreground, and immediately behind the wounded man is a tree with well-arranged branches. The trunk terminates in a mass of leaves on which is set an inscribed label.
On the left of the picture, in the middle distance, is a grove, and behind this on rising ground is set a walled city representing Jerusalem. This assemblage of buildings occupies the upper right-hand corner of the picture, and is a well-defined composition of towers, gables, spires, and chimneys of balanced outline. On the left and above the head of the Levite is a large circular domed building of Byzantine character furnished with many round-headed windows and intended to represent the Temple. In front of it are two projecting portals from which roadways lead towards the foreground. On the extreme right is a square tower with two tiers of crenellated and machicolated wall-walks, each furnished with corner rounds. The roof is capped with a sharp-pointed spire. In advance of this building is a gatehouse with two entries flanked on one side by a lower defence which is buttressed and carries a spire. Between the great tower and the temple is set a large gabled building, behind which stands another with a hipped roof and a dormer window. Both of these buildings have tall chimney stacks.
The inscription on the label is a description of the incident portrayed— it appears to have taken the form of a stanza of five lines of the sort produced by the pen of Robert Wedderburn,
part author of The Crude and Godlie Ballatis, who appears to have been living at Linlithgow about the time the cartoons were produced, or by some kindred Scottish Makar. The lines are badly obliterated and only a few of the words can be read:
This man the Levite bo [ok] …..”.
The law of Nature quhilk [to]ld th . . .
This priest ye law of [Isryal?] …. .
he…
(The south wall, west of window.)

(4) The Samaritan attending to the Wounded Man.
This tableau is badly defaced, but three people seem to have been represented in the right-hand lower half of the picture. One, in slashed breeches, is lying on his back, and the two others kneel or crouch behind him. The man on the extreme right, apparently the Samaritan, is extending his right hand towards the wounded man. His companion is now indicated only by part of a left leg, in slashed breeches and a high riding boot.
There is also a suggestion of his right forearm raised, as if the hand were holding a vessel out of which wine is being poured. The left side of the composition shows a tree in the foreground and between it and the kneeling group seems to be a mounted horseman. In the central background is a walled city approached by a roadway carried on a bridge and leading up to a gatehouse. The dominant building in the composition resembles a large church with a central high steeple. Defensive towers and houses rising behind the city wall complete the representation. To the right a Bruegelesque rocky summit protrudes above a wooded landscape.
(West wall, south section.)
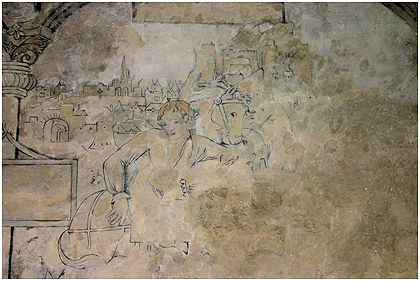
(5) The Wounded Man being Mounted on the Samaritan’s Beast.
(Picture courtesy of Adrian Mahoney @ The PR Store)
Less than half of this picture is left. The wounded man is being helped on, or off, the Samaritan’s horse and is resting his right hand on its off-flank. His hair has been carefully flattened. The helping Samaritan seems to be standing to the right behind the animal’s head. Immediately behind, a horse looks on at what is happening. The perspective of the walled city in the background is significantly different from the previous ones and shows it not on a hill but in a shallow valley.
The houses are clustered on the right and disappear behind a rocky hill, on which stands a castle fortified with towers and bastions. To the left is a market-place with a Latin cross in the centre. The market area is enclosed by the town wall, and in each of these three defensive barriers is a gatehouse, the most important being that in the wall farthest away. This building has a double portal and is capped by clustered gables surmounted by a spire. The settlement may represent Jericho with its famous walls. Above is the label which once contained the appropriate paraphrase of the parable scene in question.
(West wall, mid-section.)

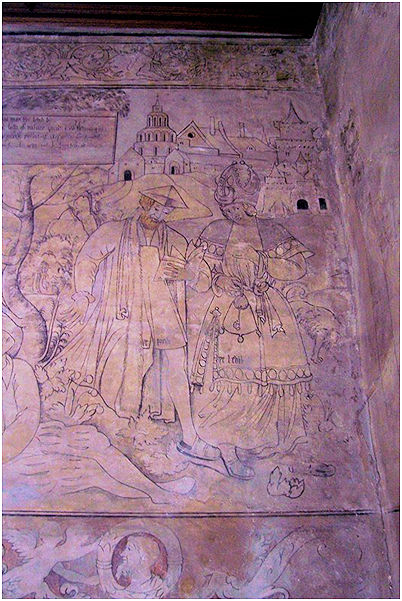
(6) The Arrival at the Inn.
This cartoon has been much defaced, but the head of the Samaritan is clearly seen. He is bearded and has long hair and wears a tall hat with a flowing lambrequin. With the left arm extended the Samaritan is pointing with his hand in the direction of an entrance porch, evidently that of the inn, which occupies the right side of the picture. Another man is ascending a flight of low steps which lead to the porch; he is seemingly helping to carry the wounded man within. Standing behind the Samaritan is a horse with the neck and head extending downwards near his right arm.
The architecture of the hostelry is Italianate in style. The doorway is flanked on each side by a column of Tuscan type, and these carry a heavy lintel, moulded at the top, with a pediment above, the tympanum being pierced by a small circular window. Behind the pediment rises an attic with a low upper storey having three round-headed windows. In the pictorial background is the entrance to the walled town in which the inn is loacted, to which a roadway leads up and through an arched entry. On the left side is a high gatehouse with a steep pitched roof, and on the same side, but inside the gateway, is a smaller house: both these buildings have crow-stepped gables. To the right is another high, gabled house, and roofs of buildings are to be seen rising behind. Although the crow-stepped gables are a typically Scottish feature, they also occurred in France and Holland.
(North wall, mid-section.)
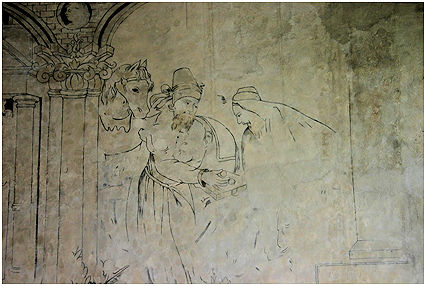
(7) The Samaritan Paying the Two Denarrii to the Host.
The left side of this picture is the only part readable. The Good Samaritan stands in the left foreground and with the right hand is placing the second denarius (often referred to as a penny) on a tablet for the receiving of money known as a nail or tome, while the innkeeper, who has emerged from the inn, looks on. The Samaritan is dressed for riding in a cloak which falls down his back, over a long, fringed, skirted doublet girded at the waist by a sword belt; trunks and spurs are attached to his ankles. He wears a head-piece similar to that shown in the former representations. The innkeeper, whose face is in profile, is bearded like the horseman, and is looking down at the nail. His head is hooded by a linen covering, which falls down over the shoulders and is held in place by a turban. Behind the Samaritan and looking over his right shoulder is his mount. The background of the picture is obliterated.
(North wall, east section.)
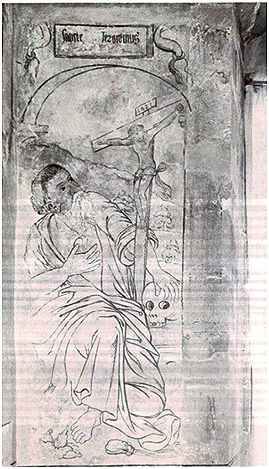
(8) St Jerome in the Wilderness.
Jerome is shown kneeling on his left knee, with the right foot, which is bare, in advance. He is looking upwards at a crucifix and beating his breast with a stone. The left hand rests on a human skull, the emblem of mortality, which lies on a bank against the base of the crucifix. The saint has a short flowing beard; he is dressed in a long, loose-flowing and wide-sleeved garment over an open-necked shirt. The forearms are bare, the sleeves being rolled up at the elbows. The crucifix on which the Saviour hangs is long shafted and of T form. Set on the top of the cross arm is the label bearing the initials I.N.B.I. At the right-hand bottom corner, lying on the ground in front of the saint is a double-corded and knobbed object which is probably the tasselled cord or chin adjustment of a wide-rimmed cardinal’s hat. The top of the picture is enclosed by an arch over which is the label bearing the inscription SANCTE JERONEMUS. The label is adorned with a tasselled and sleeved ribbon. (South wall, east of window.)
Jerome is famous for translating the Bible from Greek and Hebrew texts into Vulgate Latin in the late fourth century and spent much time in Palestine and several years in meditation and translation. He is usually depicted as naked from the waist up but, as with the victim of the thieves, is here fully clad. For a time he acted as the secretary of the Pope in Rome and hence is often shown with the dress of a cardinal, even though this was not contemporary with his life. The appearance of just the tasselled cord from the cardinal’s hat is particularly interesting as there is no space for the hat itself.
For those with knowledge of iconography it was probably perfectly obvious what it meant. However, at the time of the painting Scotland was going through the throws of the Reformation and depicting Catholic items may not have been considered proper.
In Pieter Coecke van Aelst’s 1530 painting showing St Jerome in his study the saint has a finger placed on a human skull and several other emblems of the vanitas motif appear in the background. From then on the skull appears regularly in art in association with St Jerome.
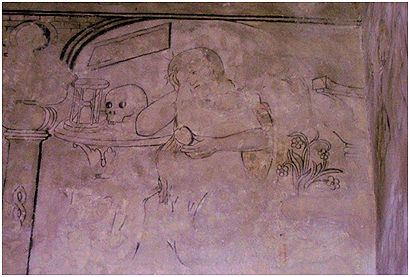
(9) St Mary Magdalene in Penance.
This is a counterpart of the picture of St Jerome, inasmuch as the representations are symbolical of Christian Penitence. Mary is shown as an elderly women dressed in a ragged garment. She is seated and rests her head in the right hand, the elbow being supported on a round table on which are a human skull and an hour-glass. The left arm is drawn across the waist, and the hand holds a small flat heart-shaped box presumably representing the alabaster container of the ointment used to anoint Jesus. The head of the saint is nimbed and her hair falls in long dishevelled tresses.
To the right is a bouquet of flowers—floral tributes cast by angel figures are not infrequent in representations of St Mary Magdalene in the Wilderness. Above the table is the outline of a label.
(West wall, north section – the picture is set over a doorway.)
According to the four canonical gospels Mary Magdalene was a wealthy woman who travelled with Jesus and was a witness to the crucifixion and its aftermath. The portrayal of Mary Magdalene as a prostitute began after a series of Easter sermons delivered in 591 by Pope Gregory I when he conflated Mary Magdalene with Mary of Bethany and the unnamed “sinful woman” who anoints Jesus’ feet. This resulted in a widespread belief that she was a repentant prostitute or promiscuous woman. It was a major controversy in the years leading up to the Reformation. In 1517 Jacques Lefevre d’Etaples published a book in which he argued against the conflation of Mary Magdalene, Mary of Bethany, and the unnamed sinner in Luke and four years later, in 1521, the theology faculty of the Sorbonne formally condemned the idea as heretical. Because the cult of Mary Magdalene was inextricably associated with the Catholic teaching of the intercession of saints it came under particularly harsh criticism by Protestant leaders. John Calvin (1509-1564) not only rejected the composite Magdalene, but criticized Catholics as ignorant for having ever believed in it.
During the Counter-Reformation the Catholic Church emphasised Mary Magdalene as a symbol of penance and artists in northern Europe drew upon an embellished story of her living alone in the desert as a penitent ascetic. A massive number of Baroque paintings and sculptures depict the penitent Magdalene, often showing her partially naked, with a strong emphasis on her erotic beauty. El Greco’s painting of the “Penitent Magdalene” (c1577) includes a human skill at her feet and this item often featured in subsequent depictions.
The 1549 Book of Common Prayer had a feast of Saint Mary Magdalene on July 22 (the same day as the First Battle of Falkirk) with a newly composed collect:
“Merciful father geue us grace, that we neuer presume to synne through the example of anye creature, but if it shall chaunce vs at any tyme to offende thy dyuine maiestie: that then we maye truly repent, and lament the same, after the example of Mary Magdalene, and by lyuelye faythe obtayne remission of all oure sinnes: throughe the onely merites of thy sonne oure sauiour Christ.”
The 1552 edition omitted the feast of Saint Mary Magdalene.
(10) Lucretia in the Attitude of Stabbing Herself.
The figure is that of a young person with long flowing curly tresses waving downwards in a dishevelled manner. A loose draping hangs on the left shoulder, envelops part of the forearm, and falls down the back. A fold of the covering is carried round the waist, expanding and partially covering the legs. The right arm is uplifted, the hand forcing the weapon downwards, and the other hand guides the point into the right breast. Lucretia has been frequently portrayed by German and other artists of the sixteenth century.
(North wall, west section.)
According to Roman tradition, Lucretia died c510 BC. She was a noblewoman of Rome who was raped by Tarquin, son of the last king of Rome. Her subsequent suicide was the spark that led to a rebellion that overthrew that monarchy and led to creation of the Roman Republic.
In 1552 Arran purchased a book by John Hopper, Bishop of Gloucester and Worcester, upon the Commandments. In it the author extols the virtues of Lucretia and St Jerome. Hopper suffered martyrdom for the Reformed Faith. Lucretia was a lady of distinguished virtues who destroyed herself in penance, consequently her portrayal was symbolic of the defence of virtue.
CONTEXT
There is little doubt that the murals in the South Room were commissioned by James Hamilton, Duke of Chatelherault and 2nd Earl of Arran in the 1550s. He had an interesting and chequered career and as this must have influenced his choice of illustrative themes at Kinneil it will be useful to provide a short outline of it. On the death of James V on 14 December 1542 he had stood next in line, after the king’s six-day-old baby daughter Mary, Queen of Scots, to the Scottish throne. He was immediately appointed as Governor and protector of Scotland and acted as Regent in the period 1543-1554. Initially, Arran was a Protestant and a member of the pro-English party. In 1543 he helped to negotiate the marriage of the Queen of Scots to the infant Prince of Wales (the future Edward VI of England) and in the same year he authorised the translation and reading of the Bible in the vernacular. On 27 January 1543 he arrested Cardinal Beaton and imprisoned him first at Dalkeith Palace and then Blackness Castle. However, in September 1543 Arran secretly met Cardinal Beaton at Callendar House and reconciled himself with his former enemy. Shortly after he became a Catholic and joined the pro-French faction. He signed the Treaty of Haddington consenting to the marriage of the Queen to the French Dauphin (the future Francis II of France). For his part in the marriage negotiations Henry II of France rewarded him by creating him Duke of Chatelherault, and making him a knight of the Order of Saint Michael. The treaty led to the seven-year war with England which is now called the Rough Wooing. In 1544 an attempt was made to transfer the regency from him to Queen Mary’s mother, Mary of Guise, but Chatelherault fortified Edinburgh and her forces retired. The following March he agreed to hand over some of his responsibilities to her, but remained regent until 1554.
The execution of George Wishart in 1546, who was burnt at the stake on the orders of Cardinal Beaton, stimulated his supporters into action and they assassinated Beaton and seized St Andrews Castle, which they held for a year before they were defeated with the help of French forces. The survivors, including Chaplain John Knox, were condemned to serve as galley slaves. Their martyrdom stirred resentment of the French and inspired additional martyrs for the Protestant faith which expanded. In 1557 a group of nobles calling themselves the Lords of the Congregation was established to promote the cause. In the first months of the Scottish Reformation Chatelherault continued to support Mary of Guise. He faced a Protestant army with the French commander in June 1559, but changed his allegiance in August 1559, joining the Lords of the Congregation to oppose her regency, and lost his French dukedom as a result. The collapse of the French alliance and the death of the Mary of Guise, followed by English intervention, in 1560, meant that they were able to implement reform on the Scottish church. The Scottish Reformation Parliament of 1560 approved a Protestant confession of faith, rejecting papal jurisdiction and the Mass. Knox, having escaped the galleys, emerged as the most significant figure. The settlement adopted a Presbyterian system and rejected most of the elaborate trappings of the earlier church.
After the death of Mary of Guise and the return of her daughter Chatelherault continued to scheme, attempting to arrange various political marriages for his son – to no avail. In 1566 Chatelherault withdrew to his estates in France, where he made vain attempts to regain his confiscated duchy. In 1569 he returned to Scotland in support of Mary but was imprisoned by the new regent, Murray, who assembled a parliament and had him declared a traitor. Murray was assassinated at Linlithgow on 23 January 1570 while Chatelherault was still in prison. He was released from prison on 20 April 1570 and in 1573 gave up his support for Mary in recognition of her infant son. Chatelherault died at Hamilton on 22 January 1575.
So, in the crucial period of the 1550s Chatelherault’s life was being heavily influenced by Mary of Guise, Mary Queen of Scots and the two Tudor queens of England. Perhaps it was for this reason that women feature strongly in the Kinneil paintings. In the South Room we have Lucretia and Mary Magdalene, and in the North Room Delilah and Bathsheba.
The conflict of faith may also make its appearance in the images. The half hidden way in which the cardinal’s hat of St Jerome was depicted has already been mentioned. St Jerome was a translator of the Bible and so a reference to 1543 and Chatelherault’s role in a similar feat. Mary Magdalene is an interesting selection. It is thought that she left her husband and a settled life to follow Jesus and in 1544 Chatelherault had also sought to separate from his insane wife. Lucretia is not a Biblical character but was a woman of outstanding virtue and moral fortitude. On the flip side she was responsible for the overthrow of a cruel and tyrannical monarchy! The themes generally represent personal moral choice in opposition to the established corrupt systems and cultural norms that governed people’s lives. The last is exemplified by the choice of the Good Samaritan as the main story. The outstanding question here being who was thy neighbour that you should treat as you would want to be treated? Good governance was key and the prominent location but small size of Justice makes its own point.
The stories behind the picture panels at Kinneil were part of the cultural education received by the Scottish aristocracy – the learned Classical and Biblical lexicography. Another thing that Mary Magdalene and St Jerome have in common may speak even more closely of Chatelherault’s own circumstances when he commissioned them in the 1550s and was about to hand back the regency of the country. They both retired from controlling positions close to the centres of power to live quiet lives on the margins where they continued to have influence. St Jerome had been a secretary to the pope in Rome but went to the Holy Land where he continued his translation work and acted as a tutor. Mary Magdalene had been with Jesus and according to tradition retired to the Wilderness in penance. By contrast, Lucretia had led a quiet life until her rape by the king’s son and her suicide which had an enormous impact upon the governance of Rome long after she was gone.
The similarity of works of art across Europe at this time has led to the conclusion that there were “pattern books” of cartoons for tapestries and wall paintings. Chatelherault would presumably have carefully chosen those most suited to his taste, circumstances and purse. However, he may simply have remembered the excitement of hearing the stories during childhood, or he may have been pleased by the composition and design. Given that their execution must have been expensive I prefer to think that they reflect his role as a maverick!
BIBLIOGRAPHY
| Apted, M.R. | 1966 | The Painted Ceilings of Scotland, 1550-1650. |
| Richardson, J. | 1941 | ‘Sixteenth and Seventeenth Century mural decorations at the House of Kinneil, Bo’ness, West Lothian.’ Proc Soc Antiq Scot. 184-204 |
